Skip to product information
In stock


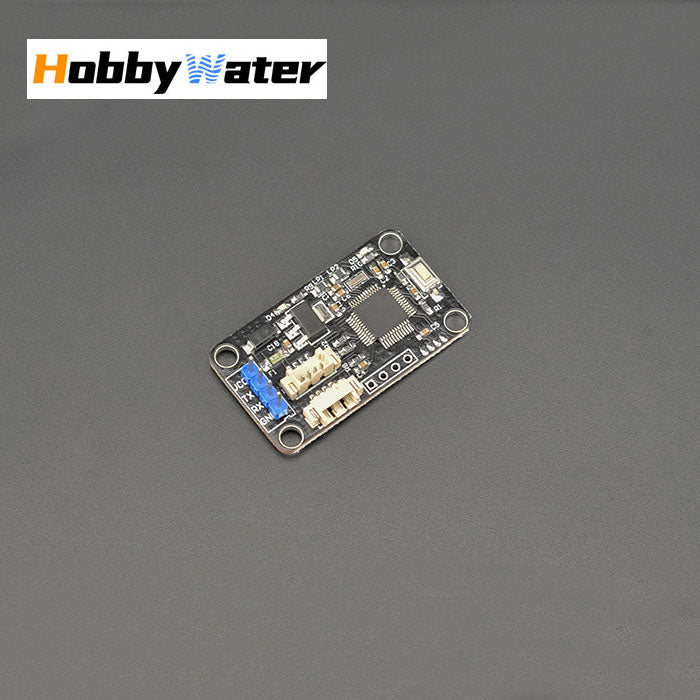
I2C Level Converter & Depth Sensor Board for Arduino/ROV - 0-300M MS5837 Compatible
$26.00 USD
Customization Service
We are the OEM ODM manufacturer. For bulk orders and custom solutions, please contact us at official@hobbywater.com
When will I get my order?
We prioritize fast order processing. For in-stock items, orders placed before 4:00 PM (Beijing Time) will be shipped the same day. Standard orders typically ship within one week, while customized orders require approximately 15-30 business days for production and delivery. Delivery times may vary under special circumstances.
Shipping Methods
We ship to most countries worldwide. However, please ensure compliance with your local import regulations.
- For the USA: We offer tax-inclusive shipping options. Expedited orders are shipped via DHL, UPS, or FedEx. Note: DHL does not allow undervaluation.
- For other countries: Tax-inclusive shipping is available upon request. Otherwise, orders will be shipped via 4PX by default.
For specific shipping requirements, please contact us in advance.
I2C Level Converter & Depth Sensor Development Board
For Arduino & OpenROV DIY Kits
Key Features
✔ 5V↔3.3V Logic Conversion – Safely connect 3.3V sensors (e.g., M10) to 5V Arduino/RPi
✔ MS5837 Depth Sensor Support – 0-300M range with ±0.01M resolution
✔ Serial Data Output – Corrected depth/temperature via UART (115200 baud)
✔ Compact & Low-Power – <0.1A current draw at 5V DC
✔ Plug-and-Play – Pre-configured for ROVmaker/OpenROV kits
Technical Specifications
- Input Power: 5V DC
- Current Draw: <100mA
- Depth Range: 0-300 meters
- Temperature Range: -20°C to +85°C
- Serial Protocol:
- Baud Rate: 115200 (adjustable)
- Data Format:
T=XX.XXD=XX.XX\r\n(e.g.,T=25.27D=1.21= 25.27°C, 1.21m depth)
Package Includes
- 1 × I2C Level Converter Board
Note: MS5837 sensor not included
Applications
- Arduino/RPi Projects – Interface 3.3V sensors with 5V MCUs
- ROV/AUV Depth Sensing – Real-time depth/temperature monitoring
- Marine Research – Data logging for underwater robotics
- Educational Kits – STEM projects involving pressure sensors
Why Choose This Board?
- Precision Correction – Outputs calibrated depth/temperature data
- Wide Compatibility – Works with MS5837 and other I2C sensors
- Simple Integration – Serial UART output for easy coding
- Robust Design – Operates in extreme temperatures (-20°C to +85°C)
Rovmaker OpenROV Diy Kit AUV Depth Sensor Development Solver Board Correction Function Serial Output Depth Gauge
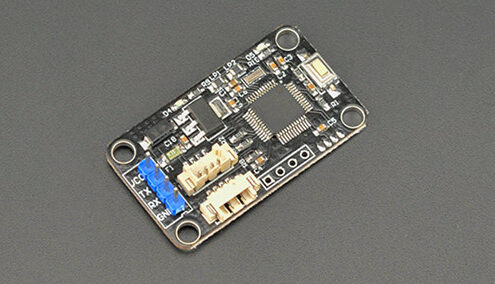
The depth sensor board has the following function:
- Read the measurement information of the depth sensor;
- Read the correction data of the sensor;
- The output depth after serial port correction;
- Temperature information;
Thruster Safety: Quick Guide
1. For Your Safety:
- Keep Clear: Never put hands, feet, or anything near the propeller when it's plugged in. It can spin without warning and cause injury.
- No Water, No Power: Do not run the thruster in air for more than 10 seconds. It needs water to cool itself or it will break.
2. For The Thruster's Safety:
- Check Seals: Always check that the rubber O-rings are clean, greased, and undamaged before putting it in water.
- Avoid Debris: Keep it away from weeds, sand, and plastic bags. These can jam and break the propeller.
- No Regular Glue: Do not use normal threadlocker (screw glue) on any screws. It will crack the plastic body. Only use a kind that is safe for polycarbonate.
3. Simple Rules:
- Test First: Always test in a bucket or pool before going to open water.
- Rinse After Use: Always rinse with fresh water after use, especially in saltwater.
- Store Safely: Keep it in a case to protect it from bumps and dust.
Thruster Propeller Guide
1. Two Propeller Types:
- You get two propellers: one labeled "CW" (spins clockwise) and one labeled "CCW" (spins counterclockwise).
2. How Thrust Works:
- Forward Thrust (Recommended):A CW propeller pushes best when spinning clockwise.A CCW propeller pushes best when spinning counterclockwise.✅ Use this for maximum power and efficiency.
- Reverse Thrust:Both can also spin the opposite way to push backwards.⚠️ This works but is weaker and less efficient.
Quick Tip: Always check the label (CW/CCW) to make sure you have the right propeller installed for the direction you want to go. For the strongest push, use forward thrust.
What You Need to Run a Thruster?
The Thruster: The main unit, which contains a brushless DC motor.
- Power Source: A battery pack or power supply.
- A Controller: Something to tell it how fast and which way to spin (e.g., a remote control).
How to Connect It:
- If your thruster has a built-in ESC:
You can often connect it directly to a standard PWM receiver. - Important Note on Power:
If your receiver or ESC does not have a BEC (Built-in Eliminator Circuit) to power itself, you will need to add a separate BEC module. This provides the necessary power for the electronics.
Thruster making strange sound,broken?
It's normal for our thrusters to be loud.They use plastic bushings, so small movements between parts can cause sound. This noise is greatly reduced underwater, as water lubricates and cools the system.Never run them dry for more than a few seconds—it can permanently damage the bearings. Every thruster is tested to work properly.
